Many of us only think about inspecting our home closely if we’re putting it on the market, but giving your property a regular once-over can help spot any potential problems before they start, saving you time, hassle and money in the long run. From loose roof tiles to leaky pipes, here’s the 12-step home health check that can identify common issues at an early stage, so you can avoid stressful and potentially costly surprise breakdowns. Some of these tasks will take just a few minutes, but could save you thousands down the line - so there's no reason not to tick them off now!
1. Get your boiler serviced
If you don’t have an annual reminder or have it written on the calendar, check your household paperwork to see when you last had the boiler serviced. It should be done once a year to ensure it runs effectively and efficiently and many boiler warranties are invalid if you don’t. Heating engineers get really busy and booked up during the winter, so try to schedule a service in the quieter months. It also means it’s less likely to break down when you really need it most, and it will keep your energy bills as low as possible. This must be done only by a qualified Gas Safe registered engineer.
2. Test your smoke alarms and carbon monoxide detector
We should be testing our smoke detectors once a week, so if you haven’t done it in a while, this is your cue. To test them, simply press and hold the test button. It takes a few seconds to start but then you should hear a very loud siren that continues as you keep pressing. If the sound is weak or not there at all, it’s time to replace the batteries. You should also replace the detectors after 10 years with new ones, even if they are hard-wired into your electrics rather than battery operated. You should ensure you have a carbon monoxide detector, too, and this should be tested monthly to make sure the alarm sounds.
3. Locate the stopcock
One of the most important things you should know about your property is where the stopcock is. This is the tap or valve which controls your connection to the mains water supply, and it's vital you can access this quickly to turn off the water supply in the event of a burst pipe or leaking tap. In most homes, it’s under the kitchen sink. If not, try the downstairs bathroom. You should ideally be ensuring you can easily turn it off and on again every six months. If it’s stuck or too hard to turn, ask a plumber to help. It’s also good to know if you have an external stopcock. This will be located along the outside edge of your property and is the responsibility of your water provider. If you have a water meter, an external stopcock is usually in the same place.
4. Inspect your soffits, fascias and guttering

Stand outside your home and take a look up at your soffits, fascias and guttering from all angles – front, back and sides. Use binoculars if you need to and see if there’s peeling or flaking paint on wooden fascias and soffits, any holes or gaps in the fascias, soffits and guttering, leaks from a recent downpour or if the gutters are full of leaves and moss. Wet or dry rot, cracking and warping can all occur as a result of prolonged exposure to the elements while cracks or gaps in vinyl soffits and fascias can be a result of temperature variations. If left untreated, these can cause water damage and damp inside the property as well as damage to the roof rafters and joists, which could then mean a new roof – a huge expense that might otherwise be avoided. If anything looks amiss, call in the experts.
5. Get a look at the roof
While you're checking out the soffits, fascias and guttering, it's also a great moment to get a closer look at your roof tiles. Luckily, you don't need to get out the scary telescopic ladders to do this! Stand back from the house and use your binoculars if needed to identify potential problem areas, including cracked, loose or missing tiles, discolouration, moss or mould, damage to ridges or flashings that are separating from the rest of the roof.
If possible, head inside and get into the loft to see if there is any sunlight coming into the loft from gaps or holes. If anything looks like it needs attention, call in a professional roofer. Ideally you want a few different opinions and quotes for repair, not just one, so ask family, friends and neighbours for recommendations and make sure the roofer is a member of a recognised trade organisation such as the NFRC, which is The National Federation of Roofing Contractors.
6. Touch up your woodwork
If your home has wooden external door and window frames, do a regular check for any rotten wood or flaky paint. Where necessary, you can do simple repair jobs yourself. For small areas, it’s usually a case of removing the rotten timber, applying exterior wood hardener and filler, sanding down then painting with a specialist exterior wood preserver and paint.
Even if the wood seems OK, you should ideally be protecting them against the elements by repainting every three to five years, ideally in the summer months when it’s dry outside. This is also a chance to check for any cracked glass panes, which will need to be replaced by a professional glazier.
7. Repair worn-out bathroom seals
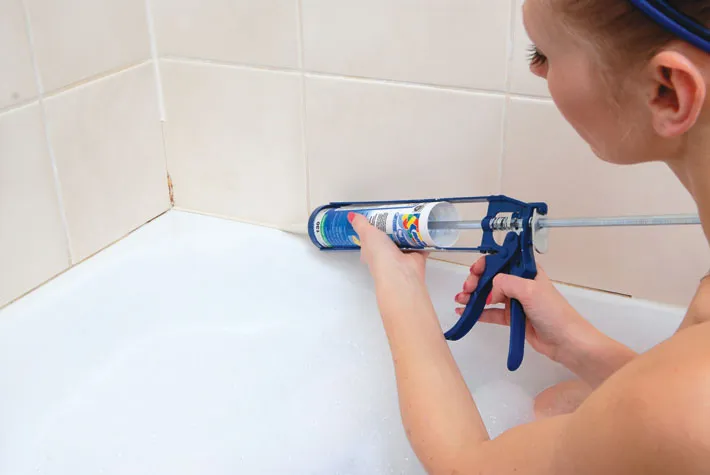
In the bathroom, en suite and cloakroom, take a good look at the seals around the bath, basin and shower to make sure the silicone is still in good condition. This is because any gaps or broken seals let water in and can cause mould and water damage in the parts of the bathroom you can’t see. To remove old or broken sealant, use a Stanley knife or a sealant remover then clean the area, apply masking tape above and below where the silicone will go and apply new silicone. Remember to fill the bath with water first, as you want to make sure the sealant doesn’t crack when you run a bath. There are plenty of online tutorials to help you.
8. Bleed the radiators
It’s easy to forget about the central heating when we don’t use it, but now’s the time to check that all your radiators are working properly. Turn the heating on for a few minutes and work your way round the house, feeling all the radiators. If any of them aren’t getting warm, they might need bleeding. Ideally you should do this once a year anyway but doing it now before winter will allow you to fix any issues before you really need the heating on. Bleeding them is quick and simple - all you need is a radiator key from a hardware or DIY store and a bowl to catch dripping water. It works by releasing air build-up and allows radiators to fill with hot water, preventing internal corrosion and an overheated boiler. It can also help reduce energy bills by as much as 10 percent, too!
9. Protect your pipes
We often think burst or broken pipes only happen in freezing weather, but the summer heat can also have an adverse effect on plumbing health. Early signs of potential trouble include fluctuating water pressure, discoloured or stinky water, a clanging or dripping noise coming from behind the walls or ceilings, any new mould that’s sprung up, water marks on walls or ceilings or an unusually high water bill. Even if it seems small and inconspicuous, it’s important to get it checked out straight away, as water can cause catastrophic damage to a home.
10. Measure your loft insulation
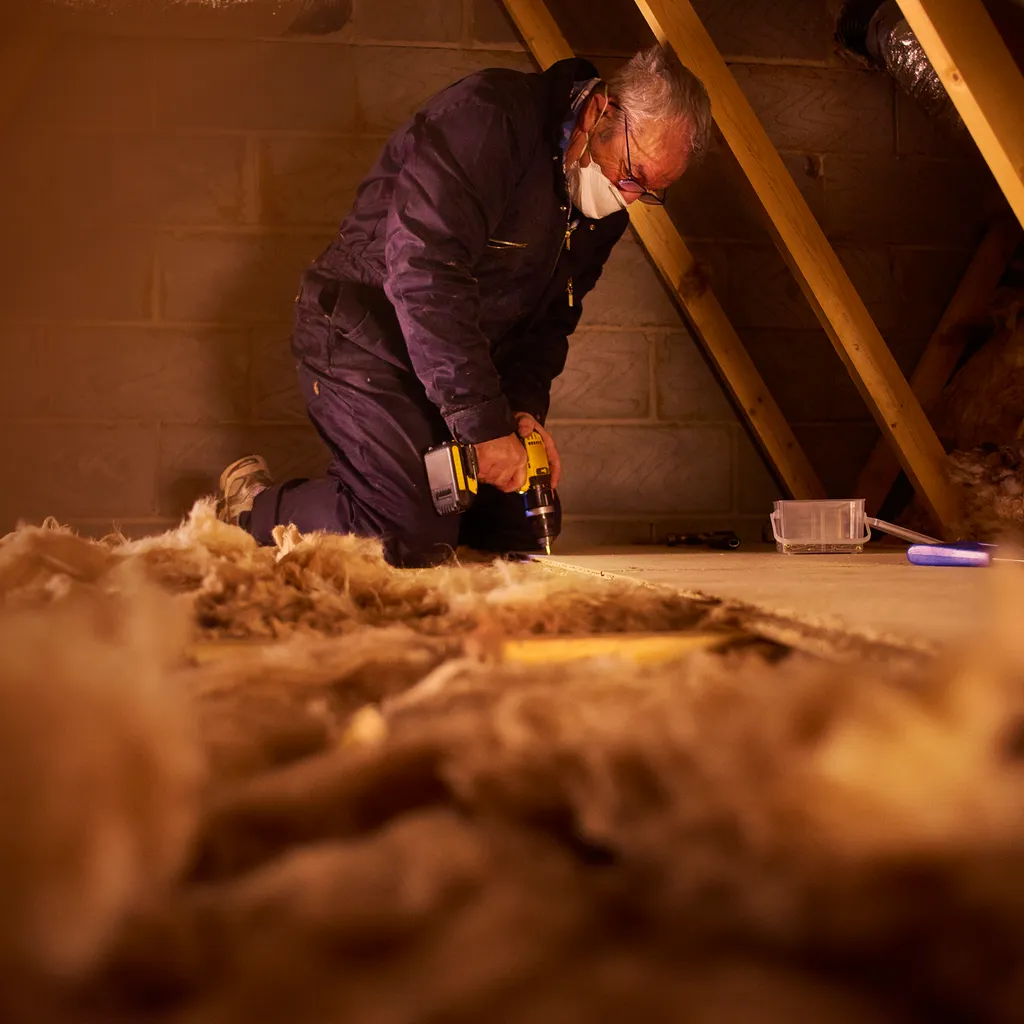
Does your home always feels on the chilly side? Do you have cold spots on regular occasions and seem to need the heating on constantly during winter – with big energy bills to match? If so, the explanation could lie in your loft insulation. You can check how thick yours is by measuring how deep it lays against the timbers in your loft. Current building regulations recommend a depth of at least 270mm for mineral or glass wool. Having the right depth can save up to £200 per year on heating bills, as well as making your home feel much more comfortable. Try not to go the other way and over compensate though, as exceeding the advised thickness could create poor ventilation, which can lead to damp, condensation and mould.
11. Give your garden fence a wobble
In the winter months, it’s all too common for fence panels to blow down in strong winds, so take a look as soon as possible to make sure yours are all standing strong ahead of potential gusts. Walk around the fencing and waggle the posts to make sure they are sturdy and not wobbling. If any wooden posts move too freely in soil or concrete, they are likely to be rotten. Look for any slats that have dropped or popped out too – these can usually be eased back into position quite simply – and keep an eye on any knots that have fallen out, as this could be the beginning of a larger patch of wood rot. If all seems fine, you might want to stain them with wood preserver now if you’ve not done it for a while or if anything needs repairing, get an experienced fencer in – before those storms appear.
12. Beef up your home security
Being burgled is a nightmare scenario – break-ins are upsetting as well as costly – so take a few moments to check all your home’s security. This means everything from door and window locks to outdoor lights, video doorbells and alarm systems. Run tests, lock and unlock and replace any batteries. It’s best to do this in daylight when you can see everything more easily and it’s a good idea to let neighbours know if you’re testing a house alarm. Also, it’s worth changing any codes to keysafes or smart parcel boxes on a regular basis – updating anyone who needs to know the codes as well.